
How to Vibe Code: A Step-by-Step Guide for Developers Who Actually Ship
I've been writing about AI coding tools for a while now, and one question keeps coming up in every conversation: "How do I actually start vibe coding?" Not the theory. Not the philosophy. The actual, sit-down-and-build-something process that gets you from an idea to working software using AI.
So I spent the last few weeks deliberately vibe coding everything. Side projects, prototypes, even parts of our production stack at Levelop. Some of it worked beautifully. Some of it was a disaster. Here's what I learned about how to vibe code effectively, step by step.
What Vibe Coding Actually Looks Like in Practice
If you haven't read our explainer on what vibe coding is, here's the short version: vibe coding is writing software by describing what you want in natural language and letting an AI coding agent handle the implementation. You focus on the "what" and the AI handles the "how."
But that description makes it sound passive. In reality, vibe coding is a skill. A bad prompt gets you bad code. A good prompt gets you production-ready features in minutes. The gap between those two outcomes is what this guide covers.
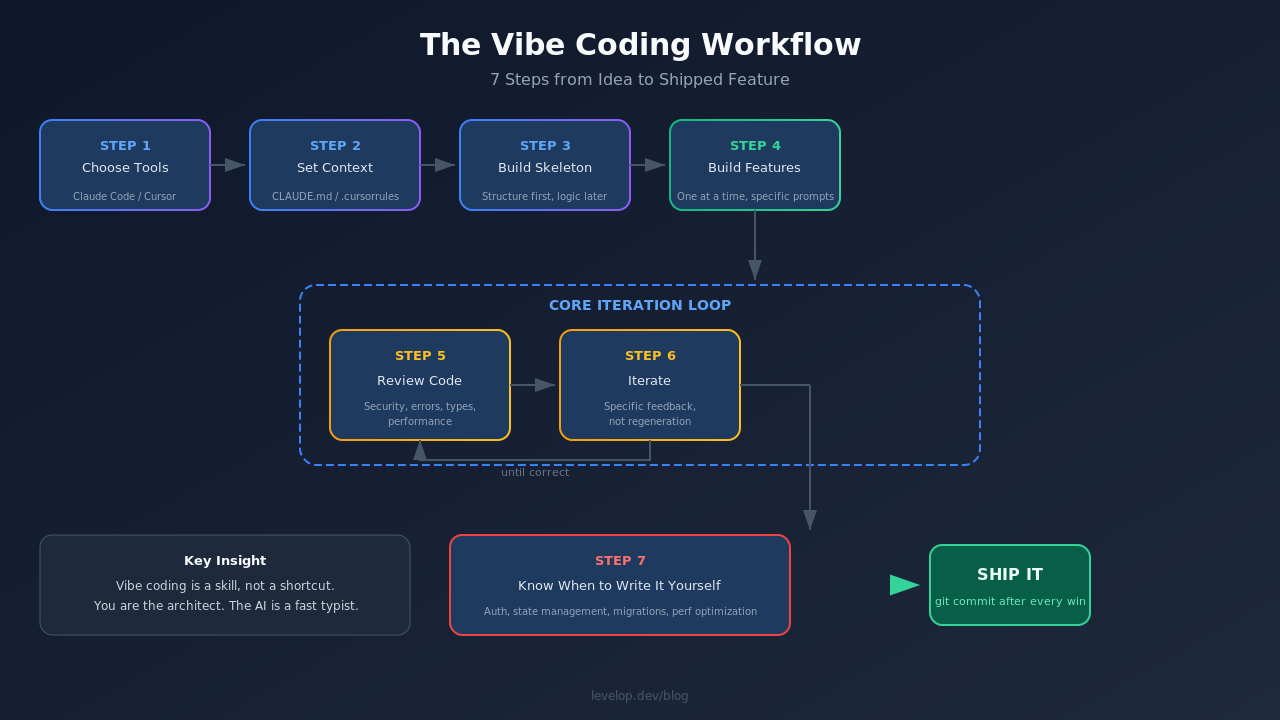
Step 1: Choose the Right Vibe Coding Tools
Your choice of tool shapes your entire workflow. The three main vibe coding tools right now are Claude Code, Cursor, and GitHub Copilot (agent mode). Each fits a different style.
Claude Code runs in your terminal. You describe what you want, it reads your codebase, and it writes the code directly into your files. No IDE required. This is what I use for most backend work because it handles large codebases well and doesn't get confused by monorepo structures.
Cursor is an IDE with AI baked in. If you like VS Code and want AI that understands your open files, Cursor is the smoothest experience. It's particularly good for frontend work where you're constantly switching between files.
GitHub Copilot Agent Mode lives inside VS Code and handles multi-file edits with a chat interface. It's the most accessible option if you're already in the GitHub ecosystem.
For vibe coding for beginners, I'd recommend starting with Cursor. The visual feedback loop is faster, and you can see exactly what the AI is changing in real time.
Step 2: Set Up Your Project Context
This is where most people fail. They open their vibe coding tool, type "build me a todo app," and wonder why the output is generic garbage. The AI doesn't know your preferences, your tech stack, or your constraints.
Before writing a single prompt, give the AI context:
# Project: Invoice Dashboard
- Stack: Next.js 14 (App Router), TypeScript, Tailwind, Prisma, PostgreSQL
- Auth: Clerk
- Deployment: Vercel
- Style: Minimal, clean UI. No component libraries. Custom components only.
- Patterns: Server components by default. Client components only when needed.
In Claude Code, you drop this into a CLAUDE.md file at your project root. In Cursor, you add it to .cursorrules. In Copilot, you use .github/copilot-instructions.md.
Step 3: Start With a Working Skeleton
Don't ask the AI to build your entire app in one shot. That's the fastest path to spaghetti code that works on the surface but falls apart when you try to extend it.
Instead, ask for a skeleton first:
Create the project structure for an invoice dashboard.
I need:
- A layout with sidebar navigation
- Three pages: Dashboard (overview stats), Invoices (list with filters), Create Invoice (form)
- Prisma schema for invoices, clients, and line items
- API routes for CRUD operations on invoices

Don't implement the business logic yet. Just the structure, empty pages with placeholder content, and the database schema.
This gives you a foundation you can inspect before the AI builds on top of it. Check the schema. Check the file structure. Fix anything that looks wrong before moving forward.
Step 4: Build Features One at a Time
Now you iterate. Each feature gets its own prompt, and each prompt is specific about behavior, not just appearance.
Bad prompt:
Add a form to create invoicesGood prompt:
Build the Create Invoice page. The form should:
- Let the user select an existing client or create a new one inline
- Add multiple line items, each with description, quantity, rate
- Auto-calculate line totals and invoice total
- Support draft (save without sending) and send (mark as sent, trigger email later)
- Validate: client is required, at least one line item, all amounts > 0
- After save, redirect to the invoice detail page
- Use server actions for the form submission
The difference is that the second prompt describes behavior and edge cases. The AI produces code that actually handles real scenarios instead of a toy demo.
Step 5: Review Before You Accept
This is the step that separates developers who vibe code successfully from those who end up with unmaintainable messes. You have to read the code the AI generates.
I don't mean skim it. I mean actually read it. Check for:
- Security holes. Does it validate input on the server side, not just the client? Does it check authorization?
- Error handling. What happens when the database query fails? When the user submits invalid data?
- Performance. Is it fetching more data than needed? Are there N+1 query patterns?
- Type safety. If you're using TypeScript, are the types actually useful or just 'any' everywhere?
Step 6: Use Iteration, Not Regeneration
When the AI produces something that's 80% right, don't throw it away and try again. Tell it what to fix.
The invoice form works, but two issues:
1. The line item quantities accept negative numbers. Add validation that quantity must be >= 1.
2. When I delete a line item, the total doesn't recalculate. Fix the state update.
Specific feedback gets specific fixes. Vague complaints like "this doesn't work right" get vague rewrites that might introduce new bugs.
This iterative loop is the core of how to vibe code productively. Prompt, review, refine. Each cycle takes minutes, not hours.
Step 7: Handle the Stuff AI Is Bad At
Every developer who tries vibe coding discovers the same gaps. AI agents are weak at:
- Complex state management. Multi-step wizards with branching logic, undo/redo systems, real-time collaborative editing.
- Authentication and authorization. The AI can scaffold auth, but the edge cases (expired tokens, role-based access, multi-tenancy) need human attention.
- Database migrations on existing data. AI-generated migrations on production databases need careful review. One wrong column rename and you lose data.
- Performance optimization. The AI doesn't know your traffic patterns. It can't predict which queries need indexes.
For these areas, write the critical logic yourself and use the AI for the boilerplate around it. That's not cheating. That's good engineering.
How to Vibe Code an App From Scratch: A Real Example
Let me walk through how I actually built a feature last week. We needed a blog publishing pipeline for Levelop (yes, the one that published this article). Here's how the vibe coding session went:
Prompt 1: "Create a Python client for the Sanity.io mutations API. I need functions to upload images and publish blog posts. Use the requests library. The project ID and API token come from environment variables."
The AI produced a clean client class with proper error handling. I reviewed it, tweaked the image upload to handle larger files with chunked uploads, and moved on.
Prompt 2: "Add helper functions that build Sanity Portable Text blocks. I need: text blocks, heading blocks, code blocks with language and filename, callout blocks with tone (info/warning/tip), rich image blocks, and FAQ sections."
This one needed two iterations. The first output used the wrong _type value for text blocks (it used "textBlock" instead of "block"). I caught it in review and told it to fix it.
Prompt 3: "Write a publishing function that takes a blog post dict with title, slug, body blocks, cover image, SEO fields, and tags, then publishes it to Sanity using createOrReplace."
Three prompts, about 20 minutes total, and I had a working publishing pipeline. The key was that each prompt built on the last, and I reviewed every output before moving forward.
Vibe Coding Tools Compared: Which One for Which Job
After weeks of vibe coding with different tools, here's my practical breakdown:
For backend/API work: Claude Code. It handles complex codebases, reads your entire project for context, and produces code that follows your existing patterns. The terminal-based workflow is fast once you're comfortable with it.
For frontend/UI work: Cursor. The inline diff view makes it easy to see exactly what changed. You can highlight a component, ask for modifications, and see the result immediately.
For quick prototypes: Any of them. When you're exploring an idea, the tool matters less than your prompts. Pick whatever you're already set up with.
We've covered this comparison in more depth in our Claude Code vs Cursor breakdown.
Common Mistakes When You're Starting Out
I made all of these. You probably will too.
Accepting code without reading it. The AI is confident, not correct. I once accepted a database migration that dropped a column instead of renaming it. Caught it in staging, not production, but it was close.
Prompts that are too broad. "Build me an e-commerce site" is not a prompt. It's a wish. Break it into features, then break features into specific behaviors.
Not versioning your work. Commit after each successful feature. If the AI's next change breaks something, you need a clean state to revert to. git commit after every accepted change is not overkill.
Ignoring the test gap. AI-generated code often comes without tests. Ask for tests explicitly: "Write unit tests for the invoice calculation logic. Cover: single line item, multiple line items, zero quantity edge case, discount application."
Fighting the tool instead of switching approaches. If the AI can't get something right after three attempts, stop prompting and write it yourself. Knowing when to take over is a skill.
What's Next After Your First Vibe Coding Session
Once you're comfortable with basic vibe coding, push into these areas:
- Multi-file refactors. Ask the AI to rename a concept across your entire codebase. This is where agentic tools like Claude Code shine.
- Test-driven vibe coding. Write the tests yourself, then ask the AI to make them pass. This gives you control over behavior while letting the AI handle implementation.
- Architecture prompts. Before building a feature, ask the AI to propose the architecture. Review the approach before any code gets written.
- Code review. Paste your own code and ask the AI to review it. You'll catch things you missed.
The developers who get the most out of vibe coding aren't the ones who let the AI do everything. They're the ones who know exactly which parts to delegate and which parts to own.
If you're interested in understanding the technology behind these tools, check out our post on how agentic AI coding tools actually work. And if you want a broader view of what's available, our guide to the best AI coding agents in 2026 covers the full landscape.
Frequently asked questions
How long does it take to learn vibe coding?
If you're already a developer, you can start producing useful output in a single afternoon. Getting good at it (writing precise prompts, knowing when to intervene, building complex features) takes a few weeks of regular practice.
Can you vibe code without knowing how to program?
Technically yes, but the results will be limited. Without programming knowledge, you can't effectively review AI output, catch bugs, or guide the AI through complex requirements. Vibe coding amplifies existing skills more than it replaces them.
What programming languages work best for vibe coding?
Python, TypeScript, and JavaScript get the best results because AI models have seen the most training data in these languages. But the gap is narrowing. Go, Rust, and Java all work well now.
Is vibe coding safe for production code?
It can be, with the right safeguards. Review every change, write tests, use CI/CD pipelines, and never skip code review. The AI is a tool, not a replacement for engineering discipline.
What's the difference between vibe coding and using GitHub Copilot autocomplete?
Copilot autocomplete suggests the next few lines as you type. Vibe coding is describing an entire feature or behavior and letting an AI agent plan and implement it across multiple files. It's the difference between autocomplete and a junior developer who can handle a full task.