
How to Use GitHub Spec Kit: A Hands-On Tutorial
GitHub Spec Kit is the open-source toolkit that turns spec-driven development from a nice idea into a workflow you can run today, with the coding agent you already use. I have spent the last few weeks driving real features through it at Levelop, and this is the hands-on GitHub Spec Kit tutorial I wanted when I started: how to use it end to end, how to install it, what every command actually does, and the rough edges nobody mentions in the quickstart.
If you have read our complete guide to spec-driven development, this post is the practical companion. There we covered the why. Here we get our hands dirty with the how, command by command, using a real feature as the running example.
What Is GitHub Spec Kit?
GitHub Spec Kit is an open-source toolkit that brings the full spec-driven development loop to your existing AI coding agent. Instead of improvising in a chat window, you write a structured specification, let the agent derive a plan and a task list from it, and only then generate code. The spec, not the prompt, becomes the source of truth.
The important design decision is that Spec Kit is agent-agnostic. It works with GitHub Copilot, Claude Code, Cursor, Codex, Gemini CLI, and several others. You do not adopt a new IDE. You add a small CLI called specify and a handful of slash commands to the agent you are already paying for. That low switching cost is exactly why Spec Kit became the default vocabulary for spec driven development on GitHub over the past year.
Under the hood, Spec Kit is mostly markdown and conventions. Each feature gets its own numbered directory, and the spec, plan, and tasks live there as versioned markdown files you can diff and review like any other code. There is no magic database and no lock-in. If you deleted the CLI tomorrow, your specs would still be plain markdown files in your repo. If you have been searching for a spec driven development GitHub workflow, this is the one the platform itself ships and maintains.
Installing Spec Kit: The Specify CLI
The entire toolkit is delivered through the specify CLI, and the cleanest way to run it is with uvx, which executes the tool without a global install. You will need Python 3.11 or newer, uv installed, Git, and one supported coding agent already set up.
# Run the specify CLI straight from the repo, no global install
uvx --from git+https://github.com/github/spec-kit.git specify init my-project

# Or initialize Spec Kit inside a repo you already have
cd my-existing-repo
uvx --from git+https://github.com/github/spec-kit.git specify init --here
The init step asks which agent you are using and scaffolds the project accordingly. It drops a .specify/ directory with templates and the slash command definitions your agent will read, plus a memory/ folder where the project constitution lives. Run specify check afterward to confirm the CLI found your agent and Git setup.
# Verify your environment is wired up correctly
uvx --from git+https://github.com/github/spec-kit.git specify check
One thing the quickstart understates: the specify init command sets up the slash commands, but those commands run inside your agent, not in the terminal. The CLI bootstraps. The agent drives. Keep that split clear in your head and the rest of the workflow stops feeling confusing.
The Spec Kit Workflow, Command by Command
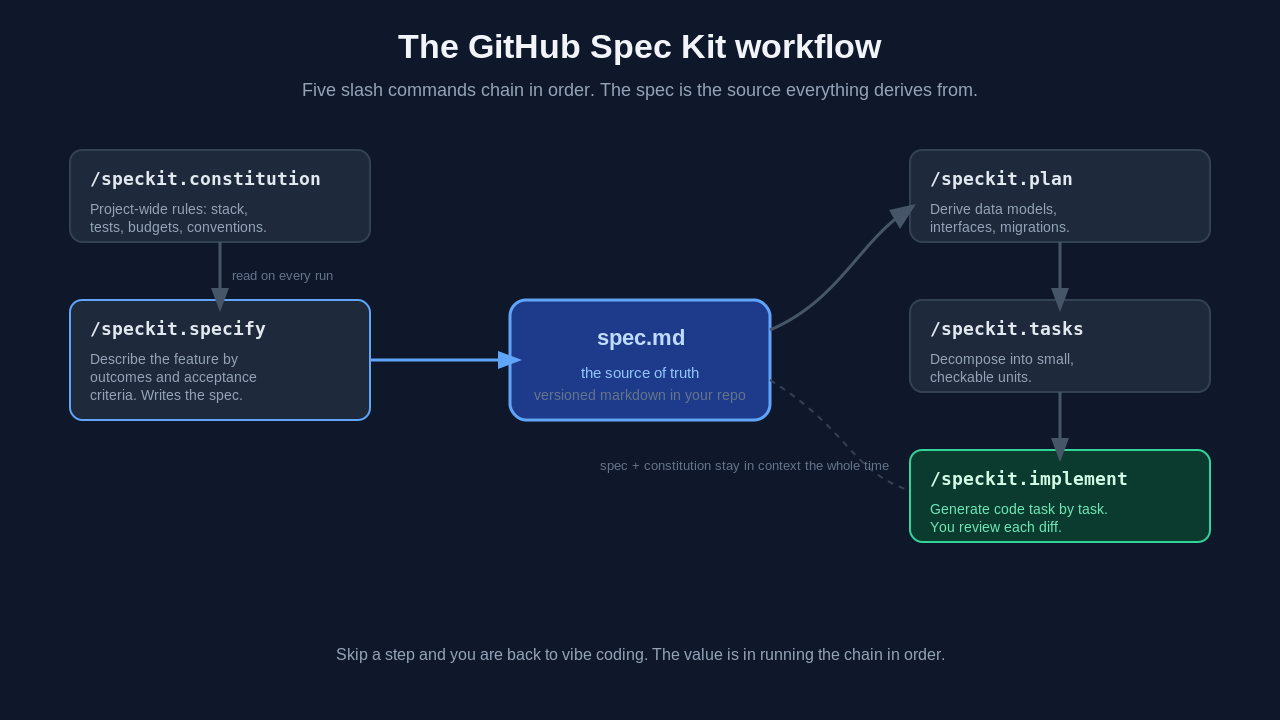
Once initialized, you drive the whole loop with five slash commands inside your agent chat. This is the heart of any Spec Kit tutorial, so I will walk through each one with what it produces and where teams trip up.
/speckit.constitution
The constitution holds the rules that apply to every feature: your stack, testing requirements, performance budgets, security constraints, naming conventions. The agent reads it on every run, so you stop repeating "we use Postgres, not Mongo" in every session.
# .specify/memory/constitution.md (excerpt)
## Non-negotiables
- TypeScript strict mode. No `any` without an inline justification comment.
- Every API route ships with an integration test in the same PR.
- Postgres via Drizzle. No raw SQL outside /db/migrations.
- p95 API latency budget: 300ms. Flag any design that risks it.
Write this once at the start of a project and revise it rarely. It is the highest-leverage file in the whole setup because it constrains every later step.
/speckit.specify
This is where you describe the feature in terms of outcomes: who it is for, what success looks like, the edge cases, and what is explicitly out of scope. The discipline is to leave implementation out. The moment your spec says "use a Redis sorted set," you have stopped specifying and started coding badly in English.
Running /speckit.specify creates a new numbered directory like specs/001-streak-freeze/ and writes a spec.md inside it. The agent will ask clarifying questions, and answering them well is most of the job. If you have ever written a product manager style brief or practised test driven development, the mindset transfers directly: describe the outcome and the acceptance test first, and let the implementation follow.
/speckit.plan
Now the agent derives a technical plan from the spec plus the constitution: data models, interfaces, contracts, migration steps. These are the technical decisions and technical requirements a senior engineer would otherwise hash out in a design doc, except here the coding agent drafts them and you review. This is the document where "Redis sorted set" finally belongs. Because the plan is derived, you can throw it away and regenerate it when the spec changes, without touching the spec itself.
/speckit.tasks
The plan gets decomposed into an actionable task list: small, independently checkable units. This task breakdown is what makes agent work reviewable. Instead of one 3,000-line diff, you get 15 focused changes that each map back to a named requirement in the spec. Each actionable task is something a reviewer (or another agent) can verify in isolation, which is why a good task breakdown matters as much as the spec itself.
/speckit.implement
Only now does code get generated, task by task, with the spec and constitution in context the whole time. Your job shifts to reviewing diffs against acceptance criteria you already agreed on, rather than guessing whether the agent understood you.
The spec kit workflow diagram below shows how these five commands chain together, with the spec sitting at the center as the artifact everything else derives from.
A Real Spec Kit Walkthrough
Let me make this concrete with a compressed version of a real feature we ran through Spec Kit: a streak-freeze feature in Levelop's practice tracker. Here is the spec that came out of the /speckit.specify step, lightly trimmed.
# spec: streak freeze
## Why
Learners lose motivation when a single missed day resets a 40-day streak.
Streak freezes (1 per 7-day window) preserve momentum without making
streaks meaningless.

## Acceptance criteria
- A learner with >= 7 consecutive active days earns 1 freeze (max 2 banked).
- A missed day consumes a freeze automatically at 00:00 in the learner's
  timezone, not UTC.
- Freeze consumption is visible in the activity log within 5 seconds.
- A learner with 0 freezes and a missed day resets the streak to 0.

## Out of scope
- Purchasing freezes. Gifting freezes. Retroactive freezes.
From that spec, /speckit.plan derived a schema change (two columns and one backfill migration), an event consumer, and a timezone edge-case matrix. Then /speckit.tasks produced 11 tasks, each tied back to an acceptance criterion. A trimmed view of the generated task file looked like this:
# specs/001-streak-freeze/tasks.md (excerpt)
- [ ] T1: Add `freezes_banked` and `last_freeze_earned_at` columns (migration)
- [ ] T2: Backfill existing learners with 0 banked freezes
- [ ] T3: Earn-freeze rule in streak service (>= 7 days, cap at 2)
- [ ] T4: Timezone-aware midnight consumption job
- [ ] T5: Activity-log event within 5s of consumption
- [ ] T6: Integration test for the 0-freeze reset path
During /speckit.implement, the agent worked task by task. I reviewed each diff against the matching acceptance criterion, which is a completely different experience from reviewing a giant unspecified pull request. Total wall-clock time was about a day. Two months later, a new contributor changed the banking limit from 2 to 3 by editing one line of the spec and re-deriving. That is the payoff: the spec is the thing you maintain, and the code follows.
Spec Kit Tips From Running It in Production
A few things I learned the hard way that the docs gloss over.
Your specs will be too thin at first. Everyone's are. The failure mode of spec driven development on GitHub is a one-paragraph spec that leaves the agent guessing. A useful test: if a wrong implementation would not visibly violate your spec, the spec is not done. Write acceptance criteria a test could check.
Commit the specs/ directory. Treat spec, plan, and tasks as first-class source. When they live in version control next to the code, your pull requests carry their own intent, and code review gets dramatically easier because the reviewer can read what was supposed to happen.
Keep the constitution short. A 40-line constitution that the agent actually respects beats a 300-line one it half-ignores. Put the genuine non-negotiables in, and leave preferences for the spec.
GitHub Spec Kit vs Other SDD Tools
Spec Kit is not the only option, and picking a tool matters less than committing to the loop. Briefly, here is how it sits next to the main alternatives, and we go deeper in our spec-driven development guide.
AWS Kiro is an agentic IDE built around specs as first-class objects, with requirements in EARS notation and design docs kept in sync as you work. It is the most opinionated choice and the natural pick if your team already lives on AWS. OpenSpec is the lightweight open-source option that tracks change proposals as diffs against current specs, with no new IDE to adopt. Claude Code can run a spec-driven workflow natively through a CLAUDE.md file plus plan mode, which pairs well with capable AI coding agents.
Spec Kit's edge is that it is free, open-source, and agent-agnostic, so it has the lowest cost to try. That made it our on-ramp, and the Microsoft developer blog walkthrough is a solid second reference once you have read the official Spec Kit repository.
When to Reach for Spec Kit (and When Not To)
Spec Kit is not free. Writing a real spec costs an hour or three, and for some work that is pure waste. Skip it when you are prototyping to learn, when the change is genuinely trivial, or when you are still exploring an API and do not know what you want yet. That is vibe coding territory, and that is fine. I keep both modes and switch on purpose. If you are new to that style, our guide to vibe coding covers when it shines.
Reach for Spec Kit when more than one person or agent session will touch the work, when the feature has real edge cases, when it touches money, auth, or data migrations, or when requirements will clearly evolve. The rule I give our team: if you would write a ticket longer than two sentences for a human, write a spec for the agent. Spec Kit is also a natural fit if you already practice context engineering, because a spec is the highest-density context object you can hand a model.
Frequently asked questions
What is GitHub Spec Kit?
GitHub Spec Kit is an open-source toolkit that implements spec-driven development for your existing AI coding agent. You install a CLI called specify, then drive a five-step loop with slash commands inside Copilot, Claude Code, Cursor, or another supported agent. A written specification becomes the source of truth, and the agent derives the plan, tasks, and code from it. The spec, plan, and tasks live in your repo as versioned markdown.
How do I use GitHub Spec Kit?
You use GitHub Spec Kit by initializing it once with the specify CLI, then driving a five-step loop inside your AI agent. Start with /speckit.constitution to set project-wide rules, write the feature with /speckit.specify, derive a technical plan with /speckit.plan, break it into checkable units with /speckit.tasks, and generate code with /speckit.implement. You review each step before moving on, so the written spec stays the source of truth and the agent never runs ahead of an approved plan.
How do I install GitHub Spec Kit?
The easiest way is to run the specify CLI through uvx without a global install. You need Python 3.11 or newer, uv, Git, and a supported coding agent. Run uvx --from git+https://github.com/github/spec-kit.git specify init my-project to scaffold a new project, or add --here to initialize inside an existing repository. Then run specify check to confirm your environment is wired up before you start the workflow.
What are the Spec Kit slash commands?
There are five core commands, run inside your agent chat in order: /speckit.constitution sets project-wide rules, /speckit.specify writes the feature spec, /speckit.plan derives a technical plan, /speckit.tasks breaks the plan into checkable tasks, and /speckit.implement generates the code task by task. Each command reads the output of the previous one, so the order matters.
Does Spec Kit work with Cursor and Claude Code?
Yes. GitHub Spec Kit is deliberately agent-agnostic. It supports GitHub Copilot, Claude Code, Cursor, Codex, Gemini CLI, and several other agents. The specify init step asks which agent you use and scaffolds the right slash command definitions for it, so you keep your existing tooling instead of adopting a new IDE.
Is GitHub Spec Kit free?
Yes. Spec Kit is open-source and free to use. You still pay for whatever coding agent you run it with, since Spec Kit orchestrates an agent rather than replacing one, but the toolkit itself has no license cost. That low barrier is a big part of why it became the most common starting point for spec-driven development.
We publish deep dives like this on the Levelop blog every week. If you are leveling up your engineering workflow or preparing for system design interviews, that is where to find us, or start at levelop.dev.